
One of the world's fastest growing web frameworks just celebrated its 10th anniversary. Rails 5 was released, and although it is still in beta, many developers and companies migrated to the new version and started using the awesome features it provides out of the box. The new big thing has got to be the ActionCable framework that automagically enables us the use of WebSockets, which makes implementing live features like chats, notifications and other real-time modules extremely simple. But, how does one achieve the same goal without ActionCable and Rails 5? Roll up your sleeves and let's start coding :)
Impact on Daily Life
Even before the internet was born, chatting systems within software applications existed. One of the first of its kind was called Talkomatic which was actually similar in terms of its primary features to the nowadays popular Slack. It offered a few channels that could accommodate up to 5 people that could exchange real-time messages. All the way from the mid-80s till today, there were many applications that were extremely popular just because they could provide an instant messaging interface for people all over the world. ICQ, AIM, MSN...you name it! As far as I know, each generation of people preferred different chat apps, but the fact is that they all had the same primary feature, with some small alterations. Also, in order to use these apps, you had to have an internet connection (via wire and modem...not wifi), and a computer. No chat apps had the power and API to provide mobile phones the data and everything necessary so we could chat via our phones. Well, maybe the applications had the potential power, but there were no smartphones that could handle it all. We didn't use our phones to connect to the internet. Heck...I didn't even know what to do on the internet if I wasn't using MSN for chatting with my friends. Strange times...
Interestingly, today's smartphones have more computing power than the army of computers that allowed the Appolo 11 moon landing. Astonishingly, there are 5 times more people that own a cell phone than a laptop, which makes it the fastest growing industry in the entire world. In 2009, which many will consider as its prime, the service was reported to attract over 330 million active users each month, placing MSN among the most widely used instant messaging clients in the world at the time. Unfortunately, Facebook introduced the private messaging feature not long after which resulted in many people leaving MSN. Just look at Snapchat, Slack, or any other growing social media apps - they all have the feature of chatting in real time. Since chatting is such an important feature, we'll dive in and dissect how it really works on a small scale, without all of the fancy features today's chatting clients provide.
Implementation
The beautiful thing with programming is that simple things can be tailored by just one sentence. In order for people to be able to send messages, we need a representation of those people and messages. Who sent a message, and what is written in that message. That's our starting point.
If you're building larger applications with many features I recommend sketching an Entity-relationship model which will minimize your migrations and changes in your codebase. If you wireframe your future to be application well, the whole development lifecycle will be much more pleasurable.
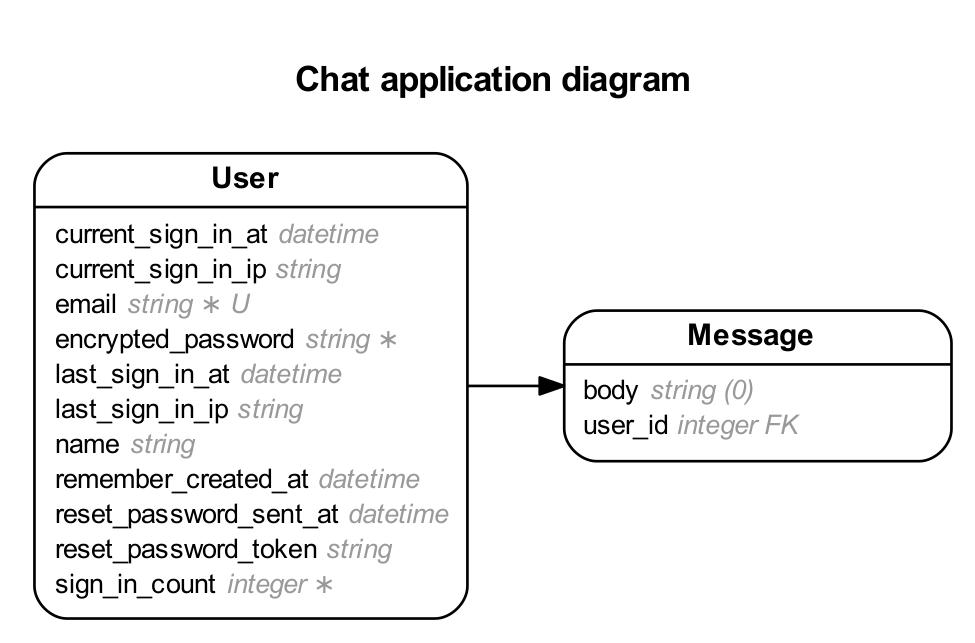
Basically, what we need is a User model that is going to have a name and an email with which the user is going to get authenticated. All of the other fields are generated by devise. Devise is the go-to gem for implementing full authentication in a Rails app. It has many modules which are mostly needed for a modern application, so there is no need for reinventing the wheel unless you need some features that aren't compatible with devise or something different that's difficult to implement next to devise.
The second model is the Message which contains the body of the message and the users foreign key in order to know who sent the message.
That's it! After firing up your brand new rails app with rails new, let's go ahead and generate basic scaffolding functionality for the mentioned architecture and models.
Since, we'll be using devise it's a good idea to generate the User model with it, so all the needed fields are in place from the beginning.
Add the devise gem into your gemfile and run:
rails generate devise:installrails generate devise UserGo into your migration file and add a name field. Our migration file for the users table will look like this:
20160405103449_devise_create_users.rbclass DeviseCreateUsers < ActiveRecord::Migration
  def change
    create_table(:users) do |t|
      ## Database authenticatable
      t.string :email,              null: false, default: ""
      t.string :encrypted_password, null: false, default: ""
      t.string :name
      ## Recoverable
      t.string   :reset_password_token
      t.datetime :reset_password_sent_at
      ## Rememberable
      t.datetime :remember_created_at
      ## Trackable
      t.integer  :sign_in_count, default: 0, null: false
      t.datetime :current_sign_in_at
      t.datetime :last_sign_in_at
      t.string   :current_sign_in_ip
      t.string   :last_sign_in_ip
      t.timestamps null: false
    end

    add_index :users, :email,                unique: true
    add_index :users, :reset_password_token, unique: true
  end
end
rails generate scaffold Message body:text user:referencesrake db:migrateI explained through my first blog post why I find Rails awesome. The basic functionality is in place. There are just a couple of other things we need for it to start working. Making sure that a user is logged in before he can view and send messages and creating a couple of users.
app/controllers/messages_controller.rbclass MessagesController < ApplicationController
  before_action :authenticate_user!
  respond_to :html, :js

  def index
    @messages = Message.all
    @new_message = current_user.messages.build
  end

  def create
    @message = current_user.messages.build(message_params)
    @message.save
    respond_with { @message }
  end

  private

  def message_params
    params.require(:message).permit(:body)
  end
end
Notice we added just one line in the MessagesController class which will authenticate a user.
Next, let's seed a couple of users into the database.
rails consoleUser.create(name: "Batman", email: "batman@example.com", password: "iambatman")
User.create(name: "Superman", email: "superman@example.com", password: "iamclarkkent")If you start your local server and go to localhost:3000/users/sign_in, you can log in and then visit the messages route where you'll be able to send and receive messages.
Now that we have everything in place, we can target the new challenge. It's not real-time! If you open up 2 browsers with different sessions and log into each one with a different user, you'll see that messages only appear after you hit the refresh button. This is where Rails 5 shines with its completely new ActionCable framework that handles web sockets and integrates an EventMachine-powered connection loop, server side and client side functionality that makes implementing real-time features extremely simpler than before.
Web Sockets
If you want to know why things don't happen immediately when a message is sent, this chapter is for you. If you're just interested how I solved the issue, skip onto the next one.
The majority of the web is based on HTTP request/responses which are enabling the communication of many hosts and clients over TCP/IP transports. That means that web applications usually don't do anything after a user visits them in a browser and parses the request and sends a response. Until the user clicks something on the page, the server won't receive any new HTTP request and therefore it will stand idle. That means that the client initiated the connection.
There are technologies that enable the server to initiate communication with the client when there is data to be sent, such as "Push" or "Comet" and the long polling technique which keeps an HTTP connection open once a client connects to the server. The bad thing with these approaches is the overhead of HTTP which isn't very good for low latency applications.
This is where Web sockets come into place. They are an API that provides "socket" persistent connections between a server and a client, which enables both to send data at any time.
There are various gems that yield web socket functionalities like websocket-rails, notifyor or the one that I'm using for this example - sync.
Bringing it to Life
The GitHub documentation supports multiple actions on partials, but the ones that we'll need in this application is rerendering the partial in real-time whenever the server receives a new instance of a message. If you're interested in how it works behind the curtains check Chris McCord blog where he described all you need to know.
In order to make everything work we need the gemfile and its dependencies, so let's put them in our Gemfile:
Gemfilegem 'faye'
gem 'thin', require: false
gem 'sync'
After running bundle to install the new gems we need to install templates from the sync gem:
rails generate sync:installAnd require sync in our asset pipeline.
app/assets/javascripts/application.js//= require jquery
//= require jquery_ujs
//= require turbolinks
//= require sync
//= require_tree .
Lastly, before we implement our changes in the main code, let's add the configuration script in the head of our application layout.
app/views/layouts/application.html.erb<%= include_sync_config %>
Now that everything's in place, we jump into our messages views directory and files where we render them.
app/views/messages/index.html.erb<h3>Messages</h3>

<%= render partial: 'message_row', collection: @messages %>

<hr>

<%= form_for @new_message do |f| %>
    <%= f.text_field :body %>
<% end %>
Let's change the keyword render to sync, and add the new method call for sync to know where to put the newly created messages, as well as changing the form to work remotely via ajax.
app/views/messages/index.html.erb<h3>Messages</h3>

<%= sync partial: 'message_row', collection: @messages %>
<%= sync_new partial: 'message_row', resource: Message.new %>

<hr>

<%= form_for @new_message, remote: true do |f| %>
    <%= f.text_field :body %>
<% end %>
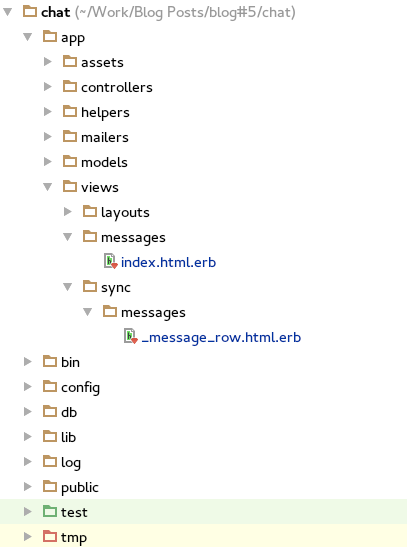
After editing the index file where all messages are rendered, we need to extract the _message_row.html.erb partial into a new sync directory like this
And lastly, make the changes in the MessagesController so it knows how to handle remote form submissions, but also to sync the new messages in place.
app/controllers/messages_controller.rbclass MessagesController < ApplicationController
  before_action :authenticate_user!
  respond_to :html, :js

  def index
    @messages = Message.all
    @new_message = current_user.messages.build
  end

  def create
    @message = current_user.messages.build(message_params)

    if @message.save
      sync_new @message
    end

    respond_with { @message }
  end

  private

  def message_params
    params.require(:message).permit(:body)
  end
end
The coding part is done. All that's left is to fire up Faye alongside your server and check the results.
rackup sync.ru -E production
rails server 
The Payoffs
Migrating production applications to newer versions can be cumbersome depending on your server architecture. Especially if you're using cheaper shared hosting packages that can manage multiple apps per server. If you need ActionCable functionalities on your current Rails 3 or Rails 4 apps, there are options thanks to the Rails community that has a great deal of gems and developers that will help you achieve your goals :)